This is the 6th chapter of the “Git – Simplified” course, in which we will go through Git from zero to hero. If you are just starting out with Git I highly recommend you to go to the 1st chapter in order to learn the basics of Git.
Table of Contents
Topics in this chapter
In this chapter we will go through the following topics:
- Git rebase:
- What is git rebase?
- Interactive rebase
- CI\CD
- What is CI\CD?
- The purpose of CI\CD
- Github Actions for CI\CD
🎤 Webinar recording (Hebrew)
You can find the presentation (ppt file) at this link. The recorded session of the webinar is live! you can view it here:
What is git rebase?
The git rebase command allows us to “rebase” (move) our current branch commits to make it appear as they “exited” from the last commit of a target branch.
The “merge” command is no different than the “rebase” command, as they both will include the new\old commits of the target branch, but the difference is, “rebase” will make it appear as if we exited straight from the target branch.
It can be used to make our graph appear more organized and linear.
Pay attention that we will only use the git rebase command when we want to have code from other branches (such as new commits from the master), be in our branch and make it appear as we have just exited branch from there.
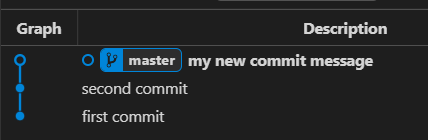
Let’s take a look at this graph:
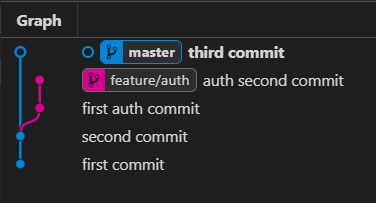
master branch and feature/auth branch, we can see that the feature/auth branch exited from the master on the second commit, and then the master committed a new commit called “third commit”In the master branch we can see we have a new commit called “third commit”, this commit is not included in the feature/auth branch. Let’s say we want to have this commit on our feature/auth branch as well.
To this we have two options:
- run
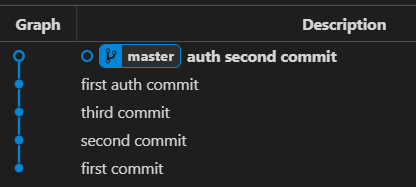
git merge masterwhich will merge between the branches. Our graph will then look like this:

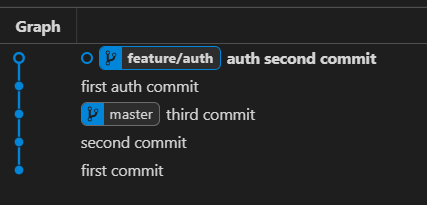
- run
git rebase masterwhich will take our branch and move it forward to appear as it exited the “master” branch from the “third commit”:
The git rebase command will make our graph much clearer to read, but the final effect is the same (both branches will contain all of the commits from the master).
Why use rebase?
Except for making our graph much clearer, if we have a specific branch we are working on and want to take changes from the “master” branch (to have the new production code on our feature branch) into our feature branch, we can use either rebase or merge. Both will make the same effect.
But after we have finished our feature branch, and we want to merge it back to the “master” branch our graph will appear much less clear, because we haven’t rebased our branch before (we will see multiple merges on the graph).
If you are merging using squash back to the master, this does not matter at all! as the branch will be later deleted and you will only have one commit. So you can use merge as long as you like on your branch, because when you squash back all of your code will be available and have one commit, and your graph will be clear.
What is interactive rebase?
The interactive rebase command is different in a way that it will allow us to pick specific commits range, and either edit, delete or squash them. This means we will be able to change our graph entirely!
Let’s take a look at this graph:
Let’s say we want to edit this graph in the following way:
- Squash the third commit to be the the second commit
- Edit the “first auth commit” commit message
- Drop the last commit.
How do we do that? That’s what interactive rebase is all about! In order to rebase we need to find the commit hash that we want to start editing the graph from, in this case, we will start editing with the “first commit”.
The “first commit” hash is “f1c7f39d95eac0006061735e688239cabe8d46e2”, we will use this commit hash to start the rebase:
$ git rebase -i f1c7f39d9 # Rebase interactively from the 1st commit
pick 194fded second commit
pick a86e2f6 third commit
pick 1389085 first auth commit
pick 1b669d0 auth second commit

# Rebase f1c7f39..1b669d0 onto f1c7f39 (4 commands)
#
# Commands:
# p, pick <commit> = use commit
# r, reword <commit> = use commit, but edit the commit message
# e, edit <commit> = use commit, but stop for amending
# s, squash <commit> = use commit, but meld into previous commit
# f, fixup <commit> = like "squash", but discard this commit's log message
# x, exec <command> = run command (the rest of the line) using shell
# b, break = stop here (continue rebase later with 'git rebase --continue')
# d, drop <commit> = remove commit
# l, label <label> = label current HEAD with a name
# t, reset <label> = reset HEAD to a label
# m, merge [-C <commit> | -c <commit>] <label> [# <oneline>]
# .       create a merge commit using the original merge commit's
# .       message (or the oneline, if no original merge commit was
# .       specified). Use -c <commit> to reword the commit message.
Pay attention to the commands we see at the bottom: “pick, reword, edit, squash, fixup, etc…”, these are a list of commands we are able to type in, instead of the “pick” command in order to change them.
For example, if we want to drop the last commit (“auth second commit”) we need to simply change the following:
pick 1b669d0 auth second commitinto:
drop 1b669d0 auth second commit # We can also write 'd' which will have the same effectNow let’s see how we do it:
In the final form of the graph after the interactive rebasing, we can see this graph:
What is CI/CD?
Continuous Integration \ continuos deployment\delivery is a new way of automating our code quality assurance and deployment.
Continous integration
The term CI means our code will be tested and made sure to pass tests and be capable of running without damaging or affecting our current system functionality.
Working with CI allows us to validate that our code is clean of bugs and did not affect our system.
If you ask yourself what are “tests”? tests are code we write that checks that our code functions as expected and we haven’t “fucked” things up \ broken the existing logic.
For example, let’s take a look at this simple javascript function:
export function sum(a, b) {
  return a + b;
}
If we were to write a test for it, it would look like this (based on Mocha\Chai):
  it('should return correct sum of 22 + 83', () => {
    expect(sum(22, 82)).to.eq(104);
  });
Continous deployment
The terms CD means we want to “deliver\deploy” our code. CD allows us to automatically push our code to the server, which means whenever we finish the development, we can almost instantly have it on our production servers.
This means faster development and faster discovery of bugs, which also means faster fixes.
The CD process usually takes place when pushing code to the “master” branch which is treated as the branch where our stable code that has been tested is ready to deploy.
Github actions for the rescue
Many source control services such as Github, Bitbucket, and Gitlab offer a built-in service that implemented CI\CD.
One of them is called “Github actions”, which is a Github implementation of CI\CD.
I highly recommend you to read about Github actions before continuing to read this post.
Our Github actions example project
Open up this repository.
I have implemented this small NodeJS project based on express, which is a simple math API with the following 2 endpoints:
- sum – takes arguments “a” and “b” and sums the two parameters (a + b).
- subtract – takes arguments “a” and “b” and subtracts the two parameters (a – b).
We have got the following index.js file:
import * as lib from './math-lib.js';
import express from 'express';

const app = express();

app.get('/api/sum', (req, res) => {
  const a = +req.query['a'];
  const b = +req.query['b'];
  return res.json(lib.sum(a, b));
});

app.get('/api/subtract', (req, res) => {
  const a = +req.query['a'];
  const b = +req.query['b'];
  return res.json(lib.subtract(a, b));
});

const port = process.env.PORT || 3000;

app.listen(port, () => {
  console.log(`Server is now listening on ${port}`);
});
And this math-lib.js:
export function sum(a, b) {
  return a + b;
}

export function subtract(a, b) {
  return a - b;
}
As we can see our project is a really simple NodeJS app.
Writing our first tests
In order to run CI\CD on this project, we need to first write down the CI process tests. For this, we base on the Mocha\Chai framework.
We will open up the math-lib.spec.js, files that end with .spec.js are test files. On this page, we need to write some tests. Under the describe we need to write down all of the tests:
describe('MathLib', () => {
  // TODO: Write your own test cases for sum and subtract
  it('should return correct sum of 22 + 83', () => {});
});
A test is wrapped up in the it statement. It contains the description and the implementation. Let’s implement those tests:
describe('MathLib', () => {
  it('should return correct sum of 22 + 83', () => {
    expect(lib.sum(22, 82)).to.eq(104);
  });

  it('should return correct subtract of 88 - 12', () => {
    expect(lib.subtract(88, 12)).to.eq(76);
  });
});
The expect statement says “we expect that the result of the statement under it must equal to a specific number. Let’s take the following line:
expect(lib.subtract(88, 12)).to.eq(76);In this example, we validate that the subtraction of 88 – 12 equals 76.
Running our tests
In order to make sure our tests are running and working well we can use the npm test command. This command will run mocha and will give us a report of the tests that passed and failed:
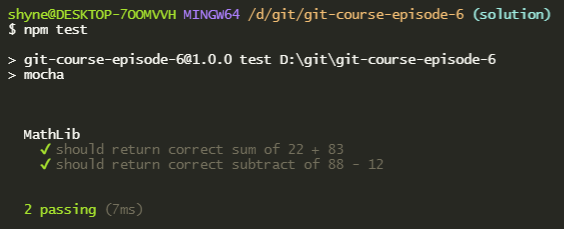
package.json file and see the “test” command and what it runs in the backgroundMove our tests to run under the CI of Github actions
Github actions are working in the following conditions:
- Our code is stored on Github repository (on Github)
- It has a
yamlfile under the.github/workflowsdirectory - This yaml file can have any name
In our example, we have already prepared a node.js.yml file with this basic template:
# This workflow will do a clean install of node dependencies, build the source code and run tests across different versions of node
# For more information see: https://help.github.com/actions/language-and-framework-guides/using-nodejs-with-github-actions

name: Node.js CI

on:
  push:
    branches:
      - master

  pull_request:
    branches: ['**']

jobs:
  test:
    runs-on: ubuntu-latest

    strategy:
      matrix:
        node-version: [12.x]

    steps:
      - uses: actions/checkout@v2
      - name: Use Node.js ${{ matrix.node-version }}
        uses: actions/setup-node@v1
        with:
          node-version: ${{ matrix.node-version }}
        # Install dependencies
      - run: npm ci
        # Run tests
        # TODO: Implement testing based on this action: https://github.com/dorny/test-reporter

  build_and_deploy:
    runs-on: ubuntu-latest
    needs: test
    if: github.ref == 'refs/heads/master'

    strategy:
      matrix:
        node-version: [12.x]

    steps:
      - uses: actions/checkout@v2
      # TODO: Now add the github actions of deploy to heroku
      # Based on: https://github.com/marketplace/actions/build-push-and-release-a-docker-container-to-heroku
Now we will go over the YAML file and explain each section:
name: Node.js CI

on:
  push:
    branches:
      - master

  pull_request:
    branches: ['**']
This is the start of our YAML file, it does the following:
- Give a name to the workflow (in this example Node.js CI), it just a description about this workflow
- The
onsection followed bypushandpull_requestsmeans that the pipeline will run each time we either push the code to the master branch or when we open up a pull request - A pipeline is the “process” where we run the automation. In this example, the pipeline will also perform the tests and the deployment.
Now let’s go over to the jobs section of our YAML file:
jobs:
  test: ... # Some other code written here
  build_and_deploy: ... # Some other code written here
The jobs section describes “jobs” we want Github to perform (processes), in this example, we want Github to run the “test” job and the “build_and_deploy” job.
The “test” job is responsible for the CI process, and the “build_and_deploy” is responsible for the CD process.
Now let’s open up our “test” job and see:
  test:
    runs-on: ubuntu-latest

    strategy:
      matrix:
        node-version: [12.x]

    steps:
      - uses: actions/checkout@v2
      - name: Use Node.js ${{ matrix.node-version }}
        uses: actions/setup-node@v1
        with:
          node-version: ${{ matrix.node-version }}
        # Install dependencies
      - run: npm ci
        # Run tests
        # TODO: Implement testing based on this action: https://github.com/dorny/test-reporter
Let’s explain what are we seeing here:
- The
runs-onsection explains which operation system runs this job, in here it’s “ubuntu-latest” - The
strategysection contains the “strategy” we are using. It’s hard to explain but here we are only telling the process to use node version 12 only (no need to run tests with different versions as well) - The
stepspart is really important as it tells the job what to actually.
Let’s talk about the steps part, and what it means. Each section within the steps is an actual command\action Github should perform when running this pipeline.
Let’s explain each part:
      - uses: actions/checkout@v2 # Checkout the Git repository
      - name: Use Node.js ${{ matrix.node-version }} # Sets up NodeJS with the node verison we specified
        uses: actions/setup-node@v1
        with:
          node-version: ${{ matrix.node-version }}
        # Install dependencies
      - run: npm ci # Same as npm install, but faster, read more about it here: https://docs.npmjs.com/cli/v8/commands/npm-ci
        # In here we will write the part responsible of running the tests and getting their output
        # TODO: Implement testing based on this action: https://github.com/dorny/test-reporter
Now that we have explained what we did here, we need to write the actual code that performs the tests.
We will base our solution on this dorny/test-reporter Github action, Github actions allow us to perform specific things easily and integration with the Github actions UI (for example, write the tests output in the web interface).
We will copy the code written in the dorny/test-reporter and edit it a bit.
      - name: Generate test report
        uses: dorny/test-reporter@v1
        if: success() || failure() # run this step even if previous step failed
        # Run tests
      - run: npm run test:ci
      - name: Generate test report
        uses: dorny/test-reporter@v1
        if: success() || failure() # run this step even if previous step failed
        with:
          name: Backend Tests Report # Name of the check run which will be created
          path: test-results.json # Path to test results
          reporter: mocha-json # Format of test results
Add this step under the - run: npm ci step.
The first command we entered is the npm run test:ci , this runs the command related to running our tests and outputting them to the test-results.json file. For this to work we have to add the appropriate command in the package.json file:
  "scripts": {
    "start": "node src/index.js",
    "test": "mocha",
    "test:ci": "mocha --reporter json > test-results.json"
  },
Notice that the “test:ci” command was added, which is the same as the “test”, but also takes the output in the format of JSON into the file test-results.json.
Then we use the dorny/test-reporter@v1 action and tell it to run. This action means that the output generated from our tests will be parsed and shown beautifully in the GUI.
Great! We now have our CI process ready, if we push this code to the master we will be able to see the following output:
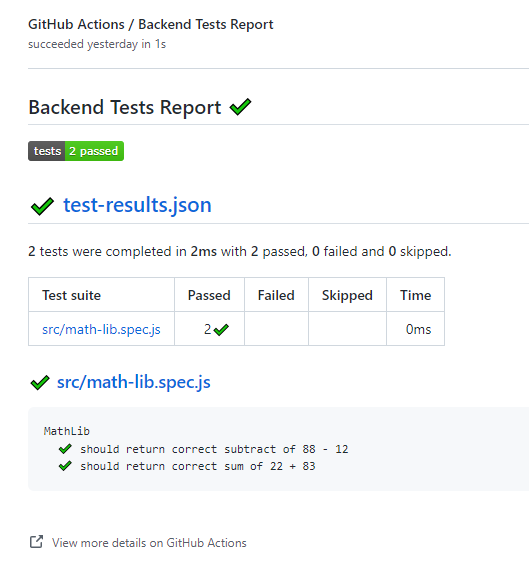
And also this output:
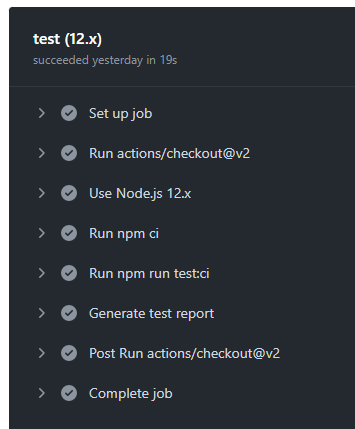
If you are wondering where we see these output, you can view them in the “Actions” menu:

Implementing CD with Github Actions and Heroku
In this guide, we won’t talk about it, but you can see the implementation described in the Webinar recording.
For those who are interested in how I implemented the CD part you can move to the “solution” branch. In short, the following code was added under the “build_and_deploy” section:
  build_and_deploy:
    runs-on: ubuntu-latest
    needs: test
    if: github.ref == 'refs/heads/master'

    strategy:
      matrix:
        node-version: [12.x]

    steps:
      - uses: actions/checkout@v2
      # Based on: https://github.com/marketplace/actions/build-push-and-release-a-docker-container-to-heroku
      - name: Build, Push and Release a Docker container to Heroku. # Your custom step name
        uses: gonuit/heroku-docker-deploy@v1.3.3 # GitHub action name (leave it as it is).
        with:
          # Below you must provide variables for your Heroku app.

          # The email address associated with your Heroku account.
          # If you don't want to use repository secrets (which is recommended) you can do:
          # email: my.email@example.com
          email: ${{ secrets.HEROKU_EMAIL }}

          # Heroku API key associated with provided user's email.
          # Api Key is available under your Heroku account settings.
          heroku_api_key: ${{ secrets.HEROKU_API_KEY }}

          # Name of the heroku application to which the build is to be sent.
          heroku_app_name: ${{ secrets.HEROKU_APP_NAME }}

          # (Optional, default: "./")
          # Dockerfile directory.
          # For example, if you have a Dockerfile in the root of your project, leave it as follows:
          dockerfile_directory: ./

          # (Optional, default: "Dockerfile")
          # Dockerfile name.
          dockerfile_name: Dockerfile

          # (Optional, default: "")
          # Additional options of docker build command.
          docker_options: '--no-cache'

          # (Optional, default: "web")
          # Select the process type for which you want the docker container to be uploaded.
          # By default, this argument is set to "web".
          # For more information look at https://devcenter.heroku.com/articles/process-model
          process_type: web
It is based on this action which implemented Heroku container registry deployment easily.
You should have your Heroku account setup and your Heroku secrets setup. You can get your Heroku API key under the settings of your account. Github secrets allows us to store encrypted data and use it in our pipelines easily.
Pay attention that we have a Dockerfile file which allows us to build the image easily and we are basing our container image on this Dockerfile .
Summary
Thank you so much for reading and attending my webinar. I’m honored and happy to have you here and you can always feel free to leave a comment or send me an email.
It is actually a nice and helpful piece of info.
I’m satisfied that you shared this useful info with us.
Please keep us up to date like this. Thank you for sharing.