This is the 2nd chapter of the “Git – Simplified” course, in which we will go through Git from zero to hero. If you are just starting out with Git I highly recommend you to go to the 1st chapter in order to learn the basics of Git.
Table of Contents
🎤 Webinar recording (Hebrew)
You can find the presentation (ppt file) at this link . The recorded session of the webinar is live! you can view it here:
Topics in this chapter
In this chapter we will go through the following topics:
- What is a git branch?
- Moving between branches
- Merging between branches (and solving conflicts)
- Git Head
- Git graph
- GIt tag
🛠️ Prerequisites
This tutorial requires knowledge in basic terminal\cmd usage, such as navigating between folders (cd command) and other basic commands.
In this guide we will use the following:
- VSCode – Microsoft source code editor. In other words called “Visual Studio Code”, pay attention as it is not Visual Studio! They are two different code editors.
Also, please install the “Git Graph” extension as we will use it more in this guide. - Git Bash – The Git bash is the main utility we will use in order to manage git.
If you are a developer, you should be fine with the rest of this guide.

👄Terminology
- Branch – A “workspace” your code lies on within the repository, where you can do whatever you like without harming your main code (“master”) branch. Think of a branch as a “copy” of your code where you can do whatever you want in, and later on merge it back to your main code (“master” branch).
- Merge – A way Git allows us to take 2 different branch them and “merge” them with each other. In other words – make 2 different code “workspaces”, and “unify” them to one without losing any code.
- Git HEAD – The “head” means the following: “on which Git commit we are currently working from”. Remember that different commits are “snapshots”? Think that everytime we do a “commit”, the “head” points to that new commit.
If you remeber, on the last chapter we checked out to different “commit” using the commandgit checkout COMMIT_HASH..., this told git that we want to move the “HEAD” into other commits.
When are exiting to a new branch, the “head” will point to the last commit we exited from.
If this is still a bit confusing, don’t worry! It will be clearer later on.
Commiting our code to the master branch

If you got to this point, I’m guessing you know how to create your local Git repository. If not, again I highly recommend doing so, as this guide depends on your previous knowledge.
Let’s start! first, let’s set up our Git repository and create a file and write some commits:
- Open up an empty folder where you want to store our new Git repository.
- Type
git initin the Git bash. - Create a new file called
a.txt, and add the line “My 1st commit”. - Save the file, and create a commit including the file with the following commands:
git add a.txt # Add the file to the staging area
git commit -m "first commit" # Commit the file- Now let’s add a second commit, in the a.txt file, add a second line called
My 2nd commitand save it. - Now type in the following commands:
git add a.txt # Add the file to the staging area
git commit -m "second commit" # Commit the file
Now if you did everything right, you will have 2 commits, and one a.txt file in the folder.
Take a look at this video if you got a bit overwhelmed, it shows what we have just done.
echo "My 1st commit" > a.txt is the same as creating an a.txt file and adding the line “My 1st commit”The master branch
Now let’s understand what a branch really is.
Let’s first type the command: git branch, this command will show the branch we are currently on. It is highlighted in green and appears with an asterisk (*).
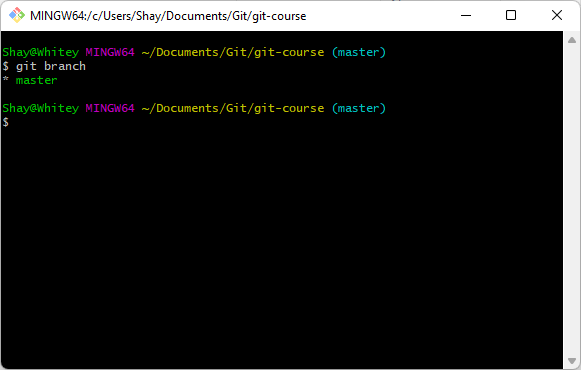
git branch , showing master as the current active branch we are working onPay attention, all of the commits we did were being committed under the “master” branch by default.
The “master” branch is usually the main branch our code is stored on and contains only the most stable, production-ready code. We usually develop our code on other branches and only merge to the master when we are ready. This is the best practice.

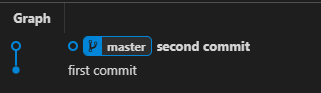
Think that every commit we do will on be stored on the branch we committed it on. Which in this case, it is the default master branch.
If we take a look at our graph (using the Git Graph extension on VSCode) we will see the following commits:
Our new branch (“develop”)
Now, we will create our own branch, do some work on it and go back to the “master” branch to see that the changes are located only on our new branch.

We will create a new branch called “develop”, the “develop” branch is used as part of the “Git flow” practice used in many companies. The develop branch means – our application unstable version, which is still under development. This branch will only contain code that is not ready for production yet, and was not tested.
If that confuses you, think of the “develop” branch as just a name for a “workspace” where our code that is still being developed lies.
So let’s do this! Let’s create a new branch:
- Type in the command
git branch develop– This tells Git to create a new “branch” called “develop”. - Now type in the command
git branch– you will see all of the branches we have locally, and branch we currently on (“master”) highlighted in green with an asterik (*). Because we only created the branch, but not moved to it, the master branch is still being used. - Now type in the command
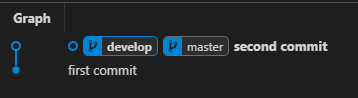
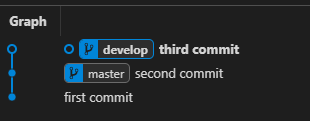
git checkout develop– This tells Git to move to our new created branch. If you type ingit branchyou will see now that thedevelopis being highlighted and is the active branch.
git branch command to see that the branch was created but currently not active, then moving to the develop branch using the git checkout develop commandNow if we open up our Git Graph we will see the following:
Putting a new commit to our “develop” branch
Now, let’s add a new line to our a.txt file and commit it, and see what happens!
- Add a 3rd line called “My 3rd commit” to our
a.txtfile and save it. - Now commit it:
git add a.txt # Add the file to the staging area
git commit -m "third commit" # Commit the file
Here is a video demonstrating what we did:
echo "My 3rd commit" >> a.txt in order to add a new line to the a.txt file, and just commit that change to the repositoryNow that we have committed our 3rd commit, and opened up the Git Graph, we will see the following graph:
Our final a.txt file should look like this:
My 1st commit
My 2nd commit
My 3rd commit
Moving back to the master branch, and merging the develop branch back into it
Now that we have committed our 3rd commit. Let’s see the effect of what a “branch” really is.
Type in the command git checkout master – This will move back to the master branch. Now if you take a look at the a.txt file you will see only the following lines:
My 1st commit
My 2nd commit
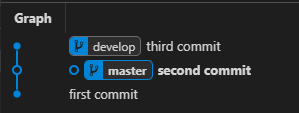
Wow! What happened? where is our last commit? 😲Well don’t panic! That happened by design. If you remember correctly, a git branch is a “workspace”, all of the commits that we did on that specific branch will only be relevant to that branch.
If take a look at the Git Graph now, we will see the following:
So, how can I take the commits I did on the “develop” branch and move them to the “master” branch?
Well, that is called a “merge”, and it won’t “move” them it would just make the “master” and “develop” branch have the same commits. It does that by taking the changes of the commits applied on the “develop” branch and re-applying them to the “master” branch, which will result in the “develop” and “master” branch having the same changes.
Let’s see it in action! Type in the command git merge develop – This command will take the last commits applied on the “develop” branch that are not common (in our case the third commit), and apply them.
If you typed the command correctly, you will see a.txt is having the latest commit:
My 1st commit
My 2nd commit
My 3rd commit
And if we have a look at the Git Graph, we will see the following:
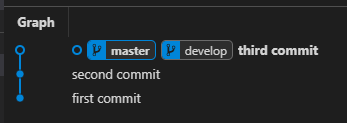
Great! Now that we have merged the two branches we better understand what a merge is. Remember that merge takes the “uncommon” commits between the branch and applies only the “differences” (the lines of codes that were changed) To the branch we are on.
Creating our 1st conflict and solving it
Now we will create a scenario of a conflict. A “conflict” is a situation in which two branches were changed simultaneously, and were changed on the same files, creating a situation “Git” does not know how it can apply the changes.
Most of the time, Git will be able to solve the conflict, even if the same file was changed on both branches. But there are times, for example, that the same line of code was changed and Git will not know what to do.

For our specific scenario, let’s say we worked on the “master” branch, on the a.txt file and added a new line, worked on the “develop” branch, added a new different line. The a.txt will have a 4th line of code that is totally different between branch “develop” and branch “master”.
In that case, Git does not know what to do, and we need to tell it what to do.
Let’s simulate this issue and solve it. Remember that we are now on the master branch:
- Edit
a.txtfile and add a forth line: “Commit from the master” and save it. - Now commit this change:
git add a.txt # Add the file to the staging area
git commit -m "commit from the master" # Commit the file- Let’s take a look at the graph:

- Now let’s move to the “develop” branch and add a new commit. Type in
git checkout develop - Add a 4th line to
a.txtwith the line: “Commit from the develop” and save it. - Now commit the change:
git add a.txt # Add the file to the staging area
git commit -m "commit from the develop" # Commit the file- Now let’s look at the Git Graph:
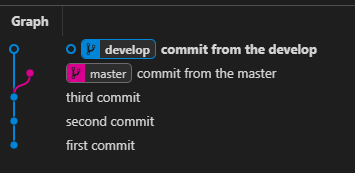
Now that we see our both branches edited the same file a.txt on the same line of code. Let’s go back to the “master” branch, and merge the changes that we had on “develop”:
git checkout master # Move to the master branch
git merge develop # Tell Git we want to take the "develop" and merge it into the master
If we have done everything right, we will see the following on our bash:

And if we open up VSCode on this file we will see the following:
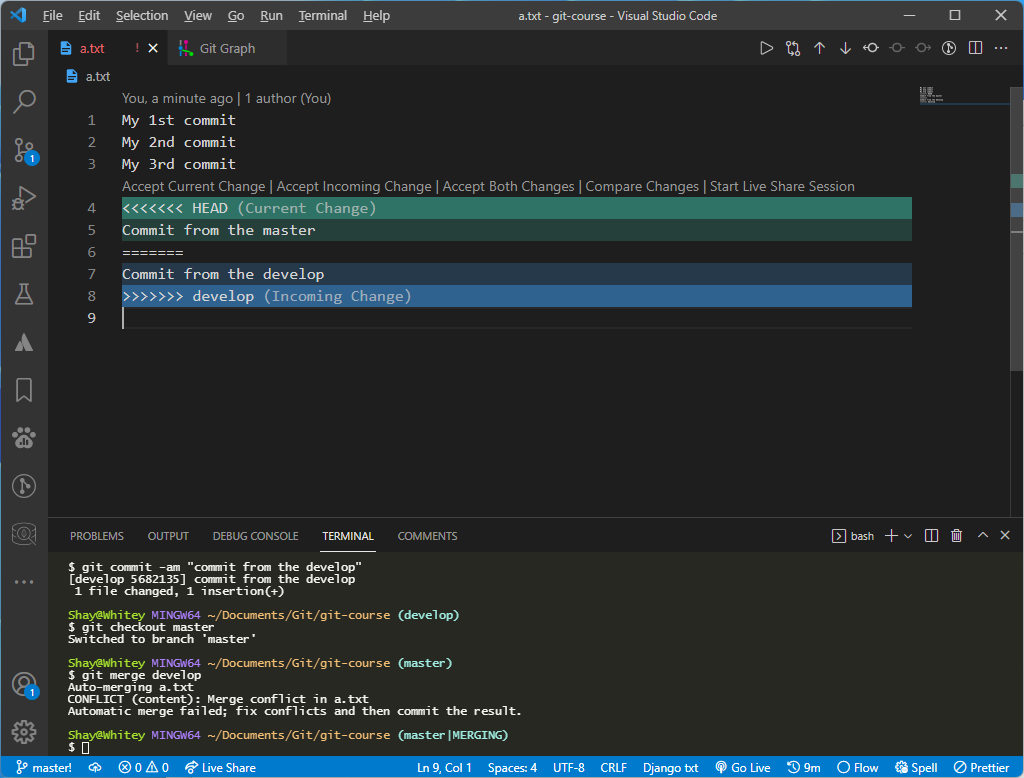
a.txt file has a conflict and VSCode requests us to solve itSolving a conflict
In order to solve this conflict we need to choose either we want the line from the “master” branch, the line from the “develop” branch, or both.
The “Accept Current Change”, “Accept Incoming Change” and “Accept Both Change” tells git what to do.
- “Accept Current Change” – Means, take the changes only from the “master” branch, don’t use the line from the develop branch. Current change always means the branch we are currently one.
- “Accept Incoming Change” – Means, take the changes only from the “develop” branch, and don’t use the ones on the master branch. In other words, take the branch we are currently merging into changes and not the one we are currently working on.
- “Accept Both Changes” – Means, take the changes from both branches. This will result in 2 lines.
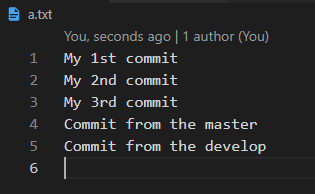
Let’s choose “Accept Both Changes” and see that we now have both lines appear under our a.txt file:
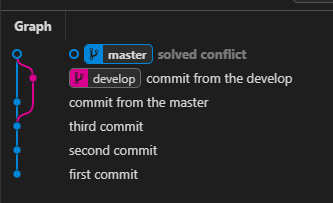
Now, in order to finish the merge, we must create a new commit with the files we have solved the conflicts:
git add a.txt # Add a.txt with the solved conflicts to the staging area
git commit -m "solved conflict" # Commit the file
If you take a look at our graph, we will see the following:
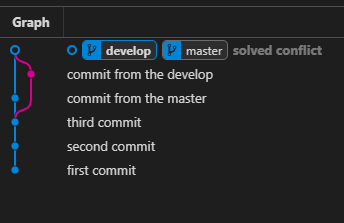
Now if we go back to the develop branch and merge develop with the master, let’s see what happens:
git checkout develop # Move back to the develop
git merge master # Merge develop with master
Pay attention that we don’t need to solve conflicts again, because we already did the previously on the master branch. Git uses that knowledge and simply merge the branches.
Now let’s look at the graph:
Here is a full video showing just what we did:
Now we understand what a branch is, how to merge between branches, and solve conflicts.
Git Graph with the Git Bash
In the tutorial I shows the graph using an extension called “Git Graph“, but we can actually see a graphical log using this command:
git log --all --decorate --oneline --graph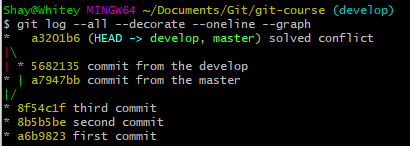
You can actually modify this command with this one:
git log --graph --abbrev-commit --decorate --format=format:'%C(bold blue)%h%C(reset) - %C(bold green)(%ar)%C(reset) %C(white)%s%C(reset) %C(dim white)- %an%C(reset)%C(bold yellow)%d%C(reset)' --allAnd the output would look like this
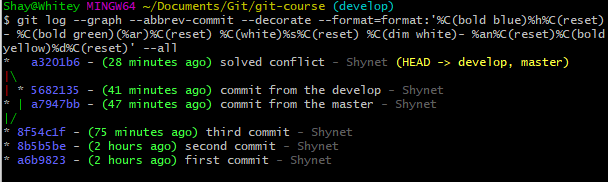
Yes yes, it looks insane! but you can always create an alias for that. Or just keep using the “Git Graph” extension.
The Git Tag
This is something a bit “more” advanced. But it is actually really easy to understand. Tags are used to describe versions of our code, for example, version: v1.0, v0.3, etc…
A git tag is used in order to “tag” or label a specific commit by giving it a name and a description. Think of a tag as giving a name to your pet. “I want to call the commit: ‘third commit’ the name v0.3”.
Let’s use this example and give the tag “v0.3” to the “third commit” we created. We do this by first getting the commit hash of the third commit:
> git log
...
commit 8f54c1f44b4b1dc4e70896828ebe131b24cf38a6
Author: Shynet <shynet@gmail.com>
Date: Fri Dec 31 10:30:14 2021 +0200
third commit
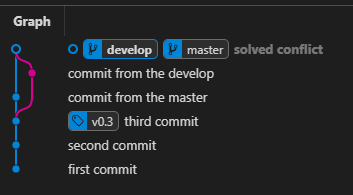
...Now that we found the commit hash is: 8f54c1f44b4b1dc4e70896828ebe131b24cf38a6 , we will simply use the following commit in order to tag it:
git tag -a v0.3 -m "alpha version" 8f54c1f44b4b1dc4e70896828ebe131b24cf38a6This tells Git to create a tag with the label “v0.3” and the message “alpha version” on the commit we copied earlier. If we take a look at the graph now:
Now we can simply move to that specific commit using the following command:
git checkout v0.3You can always delete tags using the command:
git tag -d v0.3To Summarize
Hope that you understand branches, merging, and tagging. Feel free to ask any questions at the comment section and I will reply as soon as possible.