Lately, my girlfriend and I were facing a problem: we were casting movies from our computer to our Chromecast – The only problem is that those movies had subtitle files (.srt) which needed 3rd party software that allows us to do so.
FYI: This articles contains parts of the code of “CouchPlayer” (formerly Chrome-Caster), only some pieces of the code are explained.
I’m taking into consideration you have enough development experience to “fill” the missing gaps. Unfortunately, the full source code of this app will not be a part of this article.
Table of Contents
The search for the ultimate streaming app
Well, as a technical guy as I’m, I started searching for solutions across the internet and found tools like Videostream and Vlc.
These tools worked fine in the beginning but had some major drawbacks: the videos would suddenly stop the cast or just got stuck, or we didn’t have much control of the subtitles, their size was too small or unaligned and we had to get up to the PC every time to align them.

The frustration
This was frustrating, I mean. You want to just sit down and relax while watching a movie, why should I go to the computer every time because of technical issues or unaligned subtitles?

I’m lazy, and tired of any of those solutions because they just didn’t work well.
Why can’t you just work? I mean we are in 2021 and I just can’t stream my movies without them lagging or disconnecting? or putting the subtitles in the right place?
The developer within
I had enough. The developer part of me said:
“I’m going to create the easiest and most simple solution I can that will cast media from my computer, and allows me to remote control it from any mobile, in the bed, as easy as a few clicks”
I have investigated the capabilities of Chromecast and found out that you can cast your Chrome browser tabs directly from the web browser to your TV. This worked well, with no crashes or sudden disconnections.

The prototype
I had to go a step further and get a first POC (proof-of-concept) that I can use this feature to my own benefit: I built a simple HTML page with a simple <video> tag and attached some subtitles (this is a built-in feature of HTML5). I had to manually convert my subtitles to .vtt format because the <video> tag does not support .srt format. I used this srt-to-vtt online converter for my test.
<html>

<head>
    <title>Movie test</title>
</head>

<body>
    <video width="100%" height="100%" controls>
        <source src="MyMovie.mp4" type="video/mp4">
        <track src="Subs/MyMovieSubs.vtt" default>
    </video>
</body>

</html>
After building this simple static HTML webpage with only a video and subtitles, I double-clicked on the HTML file and saw the movie is being played correctly with subtitles on. Now I just need to cast it using the built-in Cast tab feature of Chromecast.
My girlfriend and I have watched a full movie without any app or 3rd party software to do so. Just a simple chrome, some basic HTML code, and walla!

The checklist (or, what this app must do)
Now that I proved to myself that I have something to start with. I created a checklist of things I needed to make sure I’m capable of doing before starting the development:
- Simple web-app, no headache, just a website showing your movie with subtitles – this is simple, I already checked it with the simple HTML file above.
- Uses the local media files without the need of uploading them (movies can weigh more than 1GB, which loses the concept of a fast video player) – After some research, I found that you can actually play any video from your computer without even uploading it! Simply by taking the
blobobtained when the user is either selecting the file using the<input type="file" />tag or just by dragging your video and listening to thedropevent on javascript. - Control the subtitles size and placement – I made some more research and found that you can actually control the positioning, size and even the color of subtitles using CSS and some “hacky” javascript. I found this valuable blog post that allowed me to find out what I need to modify in order to align and color up the subtitles. Here is my javascript code for doing so:
  /**
   * Changes the subtitles CSS styling according to the provided css rules.
   *
   * @param {{ [name: string]: string }} cssRules
   * @memberof SubtitlesService
   */
  setSubtitlesStyling(cssRules: CssRules): void {
    const styleHTML = this.generateCSStyleHTML('::cue', cssRules);

    if (!this._cueStyle) {
      this._cueStyle = document.createElement('style');
      this._cueStyle.setAttribute('type', 'text/css');
      document.head.appendChild(this._cueStyle);
    }

    this._cueStyle.innerHTML = styleHTML;
  }

  private generateCSStyleHTML(htmlTag: string, cssRules: CssRules): string {
    const ruleHTML = `${htmlTag} { ${Object.keys(cssRules)
      .map((r) => `${r}: ${cssRules[r]};`)
      .join('\n')}}`;

    return ruleHTML;
  }

/**
 * Allow handling subtitles positioning easily.
 *
 * @export
 * @class SubtitleManager
 */
export class SubtitleAlignmentManager {
  constructor(public track: HTMLTrackElement) {}

  private _line: LineAndPositionSetting = 'auto';

  get line(): LineAndPositionSetting {
    return this._line;
  }

  set line(value: LineAndPositionSetting) {
    this._line = value;

    const cues = this.track.track.cues;

    if (cues) {
      for (const cue of cues) {
        const vttCue = cue as VTTCue;
        vttCue.line = this._line;
      }
    }
  }

  reset(): void {
    this.line = 'auto';
  }
}- You can connect and control the web-app from your phone – I have some previous knowledge and exprience with SocketIO for instant chat messaging. And it worked pretty good! I guessed that it would probably work well for controlling the media from the web-app. I simply need to build the remote controller UI and make sure it is connected to the correct session (which can be a room in terms of SocketIO).
The technology stack
I love going into new technologies, especially web frameworks. I had an idea to develop this “mini” project using Vue, which I had minor experience in the past. I had decided that’s the way I’m going to go and decided on the final stack:
- Frontend will be developed using Vue
- Backend will be developed using NodeJS based on NestJS
- Communication between FE\BE will be using API and Socket.IO
- Final project will be built on top of a docker image and will be running in a container
- Project will be hosted on DigitalOcean costing 5$ a month for the instance
Let’s get it started!
As a good student myself, I decided to go straight to what I wanted to learn – Vue. My general approach to starting new projects is that I have to start with what excited me the most, which at this point was – learning Vue.
The frontend
I started developing the frontend at first. Because this project almost doesn’t need a server (Except for the remote control) – I didn’t need any backend yet.
I started investigating the Vue library and chose to use Vue 3 with Typescript and class-based implementation.
Before approaching this I had to have some kind of a UI in my head. I first thought about what a video player would look like.
My idea was the following:
- Create a simple web player (similar to Window Media Player) with an overlay containing the following capabilities:
- Play\Pause\Go back\forward
- Import media and subtitles
- Cast video
- Keyboard shortcuts support
- Barcode to scan in order to open the remote web URL to control the session
As you can see the web player implementation looks fairly familiar, you probably ask yourself what is the barcode on the bottom right? Exactly! this barcode is what the user scans on his mobile phone in order to connect to the remote control. The remote control allows you to take full control of your video and subtitles.
We will talk about how the barcode is being generated and how it actually works later on.
Now everything looks great in the frontend! Actually, I have a video player capable of doing the following:
- Play videos
- Load subtitles and align them to whatever size and positioning
- A remote control UI (with no code yet)
- A really smooth and nice looking interface
The backend
Now what I was missing were a few things:
- Backend– I had no backend implementation yet whatsoever.
- Choose A client\server “instant” talk protocol. Relying on API could be slow (as a connection is being opened again and again). I wanted a way that the client could notify the server that the video was paused, changed its playtime, or other playback information. This got me to what we talked about earlier – Socket.IO, which is a fast WebSocket protocol.
- A session – an auto-generated string that identifies this specific video-playing session. The session identifier allows us to connect the remote to this specific player. Think if 10 users are opening multiple players at the same time. We need to identify which is which.
For this, I wrote this simple code to generate a session id for new clients:
const sessionId = randomstring.generate({
        length: 5,
        readable: true,
        capitalization: 'uppercase',
      });
randomstring is an NPM package.
Using my past programming experience, and my previous projects I relied my project on the nestjs-angular-starter , a starter template\boilerplate I wrote a year ago that allows you to easily run NestJS and Angular with authentication and users base, which has full Dockerfile and mongo database already built-in.
This gave me a good starting point, but I still had to replace the “angular” project that came built-in with my project to “Vue”, because that’s the library I wanted to learn and implement this project in.
After fixing up and successfully replacing Angular with Vue, I started writing the backend.
It only had 3 endpoints:
- generateId – Generates the session ID every time the user opens up chrome-caster.com
- getPlaybackInfo – Returns the current video playback information, such as video title, subtitles file name, current play duration, and video play state (played\paused). All of this information will be obtained from the socket connection from the video player client.
- getVTT – This simple API obtains a
.srtfile and translates it into a.vttfile format. This is essential because the<video>tag can only accept subtitles in.vttformat. This code is actually based on the srt2vtt NPM package which works great:
  @Post('/get-vtt')
  @UseInterceptors(FileInterceptor('file'))
  getVTT(
    @UploadedFile() file: Express.Multer.File,
    @Res() res: Express.Response,
  ): void {
    const vttStream = Readable.from(file.buffer);
    vttStream.pipe(srt2vtt()).pipe(res);
  }
That’s just about it for the endpoints in the backend.
Socket.IO – let’s make this thing feel alive! (where all of the magic happens)
Of course, I had to write my own implementation of managing socket connections. The main work with sockets is a bit tricky.
All socket messages are delivered to the server – the server has to “read” those messages, and detect if it should do something about them, or deliver them to the remote control.
I made it simple by “grouping” all of the users from the same session (the video player client and the remote control client) into the same socket.io room. This allowed me to broadcast all of the playback and remote messages to everyone in the room:
// Join to the room with the session id so only the remote and client can broadcast to each-other
    this.socket.join(this.session.id);
Now, our video player client needs to notify us about each change of the state in the video player, in the following cases:
- Each time the video duration changed (while the user is watching the video)
- Each time the user changed the video or subtitles
- Each time the video play state was changed (on play\pause) or the volume was changed
On each of these, the video-player client will send the following structure to the server:
export interface PlaybackInfo {
  // The video file name
  videoName?: string;
  // The subtitles file name
  subtitlesName?: string;
  // The current time the video is playing at
  currentTime?: number;
  // The duration our entire video is
  duration?: number;
  // True if the video is currently playing
  isPlaying?: boolean;
}
For example, every time the video playback time was changed, we need to notify the server about it in the video-player client:
  // Called whenever the video player changed it's playtime
  onVideoPlaytimeChanged(event: Event): void {
    const videoElement = event.target as HTMLVideoElement;
    socketClient.sendMessage({
      // This type of event says that the media playback state was changed
      type: 'media-playback',
      // The payload will only notify about changes and not about the entire structure
      payload: {
        currentTime: videoElement.currentTime,
        duration: videoElement.duration,
      },
    });
  }
Each of these messages should reach the server and the remote control client. To do so, we need to make sure to pass these messages to all of the clients connected to this session on the server.
This allows the server to later retrieve it using the getPlaybackInfo API, or deliver it directly to the remote control by sending it using socket-io.
This is the code I wrote responsible for broadcasting and handling socket messages:
// On any event obtained from socket-io client
socket.onAny((eventName, payload) => {
    try {
    const socketMsg = getSocketMsg(eventName, payload);
    this.handleSocketMsg(socketMsg);
    this.socket.broadcast.emit(eventName, payload);
    } catch (error) {
    Logger.error(
        `Failed to parse socket message: ${payload}, with error: `,
        error,
    );
    }

// Return socket messages in the structure we work with
export function getSocketMsg(
  eventName: string,
  payloadStr: string,
): SocketMsg<unknown> {
  // Event messages are stringified JSONs, parse them back
  return { type: eventName, payload: JSON.parse(payloadStr) } as SocketMsg<
    unknown
  >;
}


private handleSocketMsg(socketMsg: SocketMsg<unknown>) {
    // If the client is the player who is playing the media
    if (this.clientType === 'player') {
      // Update the playback info accordingly with only the fields that were changed
      this.session.playbackInfo = {
        ...this.session.playbackInfo,
        ...(socketMsg.payload as PlaybackInfo),
      };
    }
  }
Putting it all together
Now that we got our backend and frontend covered we need to put it all together!
Using Vue route resolvers
First thing first, when the user opens up the home page (where he can import his media and add subtitles) we need to get a session id. We will simply go to the generateId api on our Vue resolver:
  {
    path: '/',
    name: 'Home',
    component: () => import(/* webpackChunkName: "home" */ '../views/Home.vue'),
    beforeEnter: async (to, from, next) => {
      const sessionId = await apiService.generateId().then((r) => r.id);
      to.meta['sessionId'] = sessionId;
      AppService.setSessionId(sessionId);
      next();
    },
  },
Now that we got the generated id from the server, we can store it in order to connect to the SocketIO room related to this session.
We also need to create a route for the remote control. This route is the place where the remote control client will control the media remotely.
The route will connect to the same socket session where the video-player client is:
  {
    path: '/remote/:sessionId',
    name: 'Remote',
    component: () =>
      import(/* webpackChunkName: "remote" */ '../views/Remote.vue'),
    beforeEnter: async (to, from, next) => {
      const sessionId = to.params['sessionId'] as string;
      to.meta['sessionId'] = sessionId;

      try {
        const playbackInfo = await apiService.getPlaybackInfo(sessionId);
        to.meta['playbackInfo'] = playbackInfo;
        AppService.setSessionId(sessionId);
      } catch (error) {
        console.error(`Failed to fetch session id playback info: `, error);
      }

      next();
    },
  },
Pay attention that we use the getPlaybackInfo with the session id in order to get the current video that is playing and its state. This allows us to sync up the remote UI with the current playback state and information.
After that, we can generate a barcode that points to the url: https://chrome-caster.com/remote/{SESSIONID}
the qrcode NPM package is used to generate the barcode. Now we will just write a simple Vue component to wrap it up with the following HTML:
<template>
  <a
    class="text-center"
    :href="clickable ? value : 'javascript:void(0)'"
    target="_blank"
  >
    <canvas class="barcode" ref="barcode"></canvas>
  </a>
</template>
And typescript:
import { Options, Vue } from 'vue-class-component';
import { Prop, Watch } from 'vue-property-decorator';
import qrcode from 'qrcode';

@Options({})
export default class QRCode extends Vue {
  @Prop(String) value!: string;
  @Prop({ type: Boolean, default: true }) clickable!: boolean;

  @Watch('value')
  onValueChange(): void {
    this.setQRValue(this.value);
  }

  mounted(): void {
    this.setQRValue(this.value);
  }

  setQRValue(value: string): void {
    qrcode.toCanvas(this.$refs.barcode, value, (error) => {
      if (error) console.error(error);
    });
  }
}
Now we can simply call our QRCode component with the URL, here is the HTML:
<QRCode :value="qrURL"></QRCode>And the typescript:
  get qrURL(): string {
    return `${document.location.protocol}//${document.location.host}/remote/${this._sessionId}`;
  }
The remote control
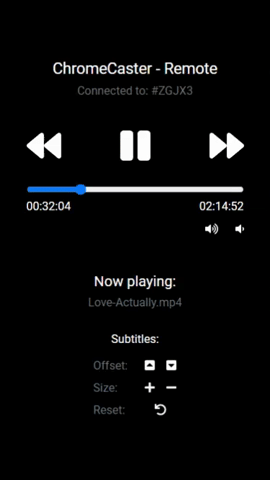
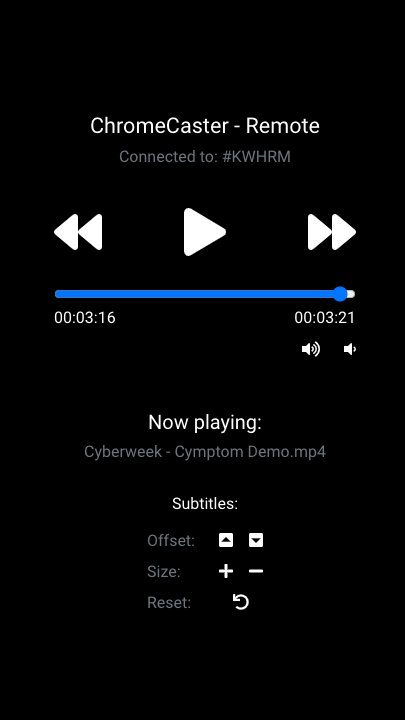
The remote control should be synced with the server in order to show the state, time, and playback information of the currently played media on the video player client.
In order to do that, we simply connect to the server using Socket.IO and handle all of the messages that are being broadcasted from the video player client. Here is the code at the remote control:
  private handleSocketMessages(): void {
    this.subscription.add(
      socketClient.message
        .pipe(
          filter((msg) => {
            return msg.type === 'media-playback';
          })
        )
        .subscribe((msg) => {
          const playbackInfo = msg.payload as SocketMediaPlaybackMsgPayload;

          // Merge with the existing playback info, as the object we get emit only what was changed
          this.playbackInfo = {
            ...this.playbackInfo,
            ...playbackInfo,
          };

          // If we got the playback status, update it
          if (playbackInfo.isPlaying !== undefined)
            this.isPlayingVideo = playbackInfo.isPlaying;
        })
    );
  }
After we have updated the playbackInfo variable with the new playback information, we simply update the remote controls accordingly:
      <div class="text-center mb-4">
        <h5>Now playing:</h5>
        <h6 class="text-muted">
          {{ playbackInfo.videoName || 'No video is playing right now' }}
        </h6>
      </div>
This is just a sample of how the client shows the current video playing name.
But how do we control the video player client? Well for that we have the sendRemoteMessage method:
  sendRemoteMessage(
    actionName: CONTROLLER_ACTION,
    actionValue?: string | number
  ): void {
    const payload: SocketRemoteActionMsgPayload = {
      actionName,
    };

    if (actionValue) payload.actionValue = actionValue;

    const msg: SocketMsg<SocketRemoteActionMsgPayload> = {
      type: 'remote-action',
      payload,
    };


    socketClient.sendMessage(msg);
  }
Now for actual example when clicking a volume up button (the HTML):
        <a
          href="javascript: void(0);"
          class="me-4"
          @click="onVolumeClick('up')"
        >
          <font-awesome-icon icon="volume-up"
        /></a>

        <a href="javascript: void(0);" @click="onVolumeClick('down')">
          <font-awesome-icon icon="volume-down"
        /></a>
And the typescript:
  onVolumeClick(action: VOLUME_ACTION): void {
    this.sendRemoteMessage('change-volume', action);
  }
The video player – how it receives remote control commands
On our video player client, we listen to the open socket and handle all of the remote messages using the following methods:
  private handleRemoteMessages(): Subscription {
    return socketClient.message
      .pipe(filter((msg) => msg.type === 'remote-action'))
      .subscribe((msg) => {
        const payload = msg.payload as SocketRemoteActionMsgPayload;

        // Applies a controller action
        applyControllerAction(
          this.videoPlayer.controller,
          payload.actionName,
          payload.actionValue
        );
      });
  }

export async function applyControllerAction(
  controller: PlayerController,
  action: CONTROLLER_ACTION,
  actionValue?: string | number
): Promise<void> {
  switch (action) {
    case 'play-pause':
      return controller.playPause();
    case 'backward':
      return controller.backward(actionValue as number);
    case 'forward':
      return controller.forward(actionValue as number);

    case 'change-currenttime':
      controller.currentTime = actionValue as number;
      return;

    case 'subtitles-size':
      return controller.changeSubtitlesSize(
        actionValue as SUBTITLE_SIZE_ACTION
      );
    case 'subtitles-offset':
      return controller.changeSubtitlesOffset(
        actionValue as SUBTITLE_OFFSET_ACTION
      );
    case 'subtitles-reset':
      return controller.resetSubtitlesStyling();

    case 'toggle-fullscreen':
      return controller.toggleFullscreen();

    case 'change-volume':
      return controller.changeVolume(actionValue as VOLUME_ACTION);
  }

  throw new Error('Not implemented!');
}
The controller instance has the implementation of how to control the video tag and it’s subtitles. For example, here is the play-pause command:
  async playPause(): Promise<void> {

    // The video is an HTML video element
    if (this.video.paused) await this.video.play();
    else this.video.pause();
  }
The final product 😁
That’s it! I finished developing the frontend, backend, and socket communications, creating the Docker image, and uploading this code to DigitalOcean. I have also developed my own CD (continuous deployment) based on Github workflows.
The development of this project took me about a week to work on and I learned a new library on the way.

Feel free to visit the https://couch-player.com app! This is the final product. Unfortunately, I can’t publish the full source code as I want to keep all of the work and effort for myself.
Feel free to ask me if you have any questions or further information missing.